Learning good Jerk technique
Take a long term approach
The Jerk is a highly complex movement and learning good technique requires a long-term approach from the first moment that training begins. Good jerk technique is not only a matter of positional correctness in the receiving position but also the whole approach to movement under the bar. At high performance standard, athletes must move with exceptional speed into low receiving positions and this requires supremely high levels of confidence.
Coaches and athletes should understand that learning the technique of the Jerk is a process that must not be rushed. If technical errors accumulate early in the learning process, they are hard to correct later. For example, a beginner athlete may miss crucial steps that teach pelvic alignment in the Jerk. As a result the athlete is in danger of developing a receiving position with a straight back leg and significant hyper-extension in the lumbar spine as shown by Figure 1. Such deficiencies in Jerk technique will significantly diminish the athlete’s long-term performance potential.

It is therefore recommended that coaches and athletes pursue the following teaching/learning objectives:
Step 1: Teach control in the Jerk Dip
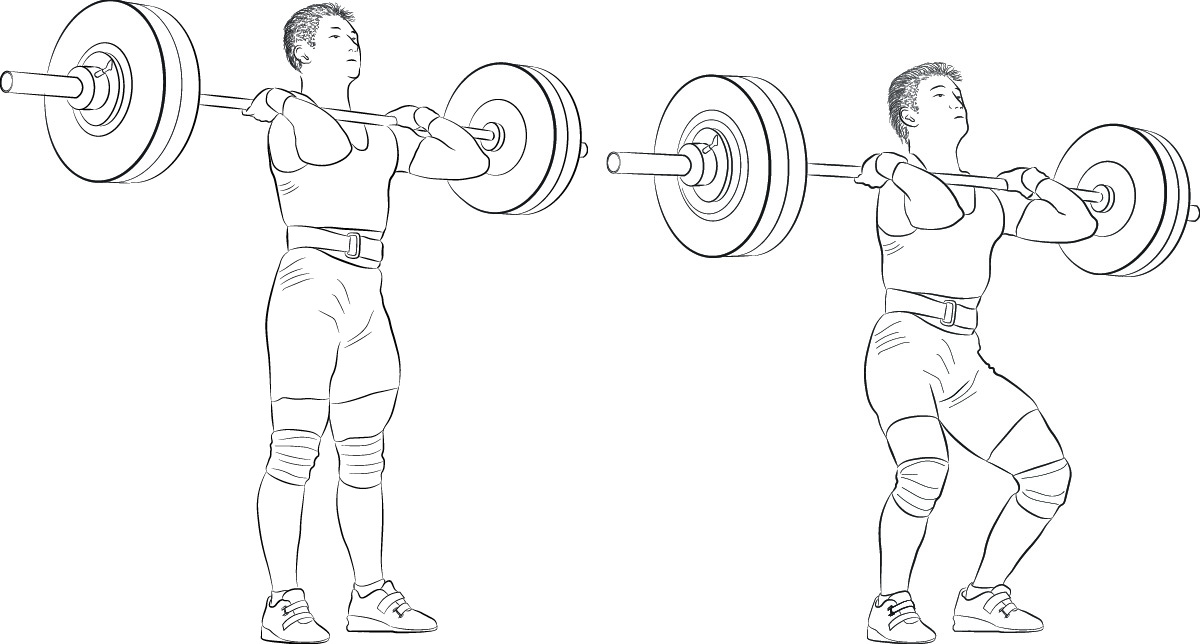
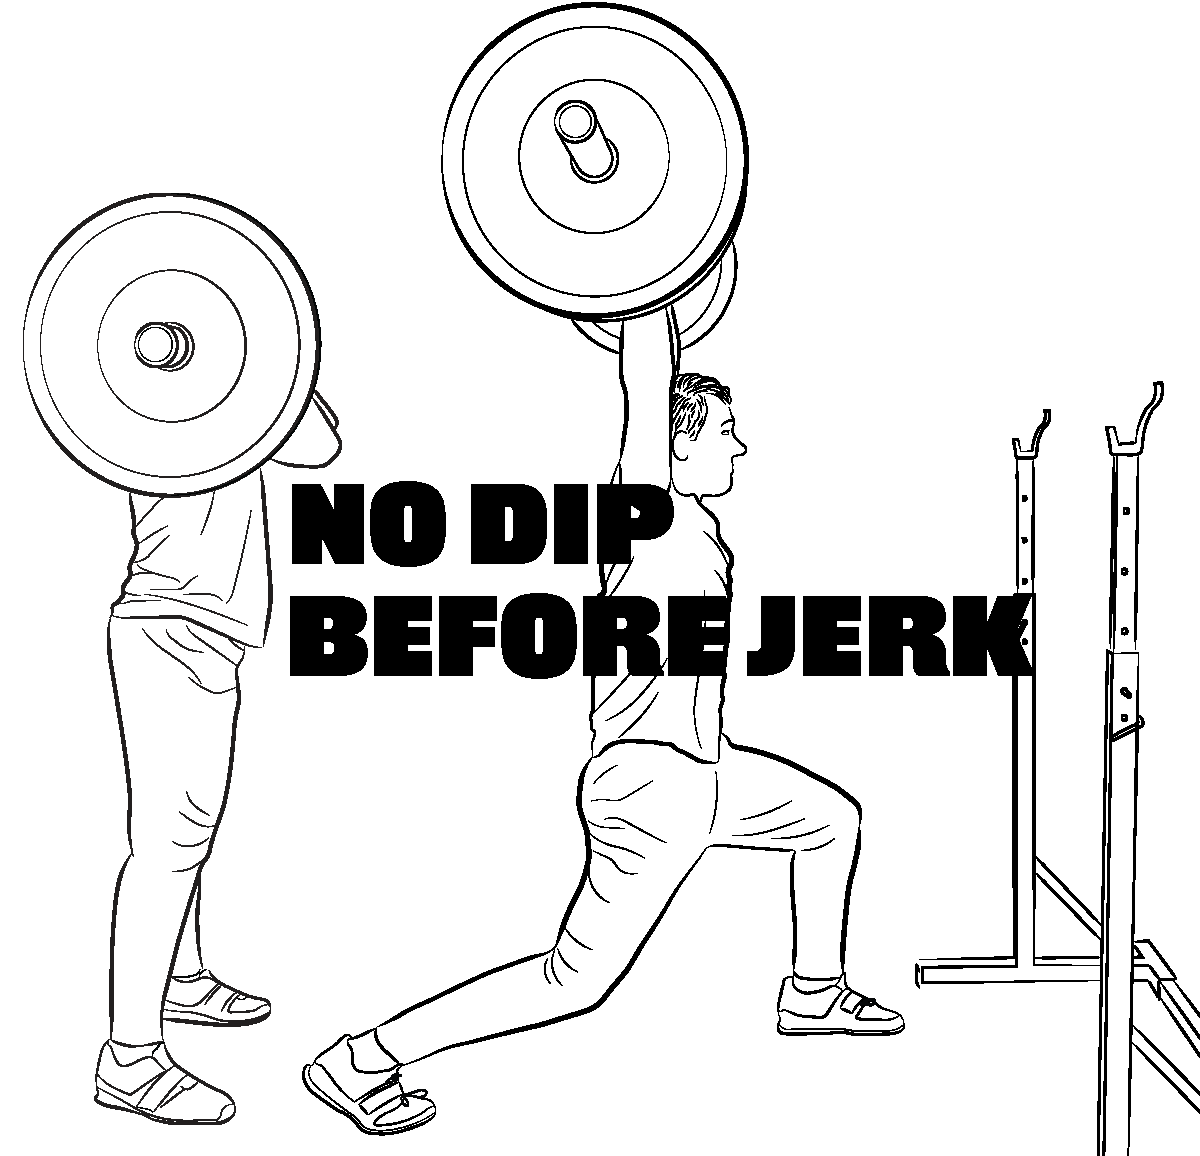
The Jerk Dip looks so simple but it is not. It is absolutely essential that athletes learn to keep the upper body completely vertical during the Dip. This means that, without deviation, the athlete’s hips must be directly beneath the bar. It is a common for athletes to exhibit the error of the hips moving backwards during the dip and, as a result, the upper body tilts forward (see figure 3).
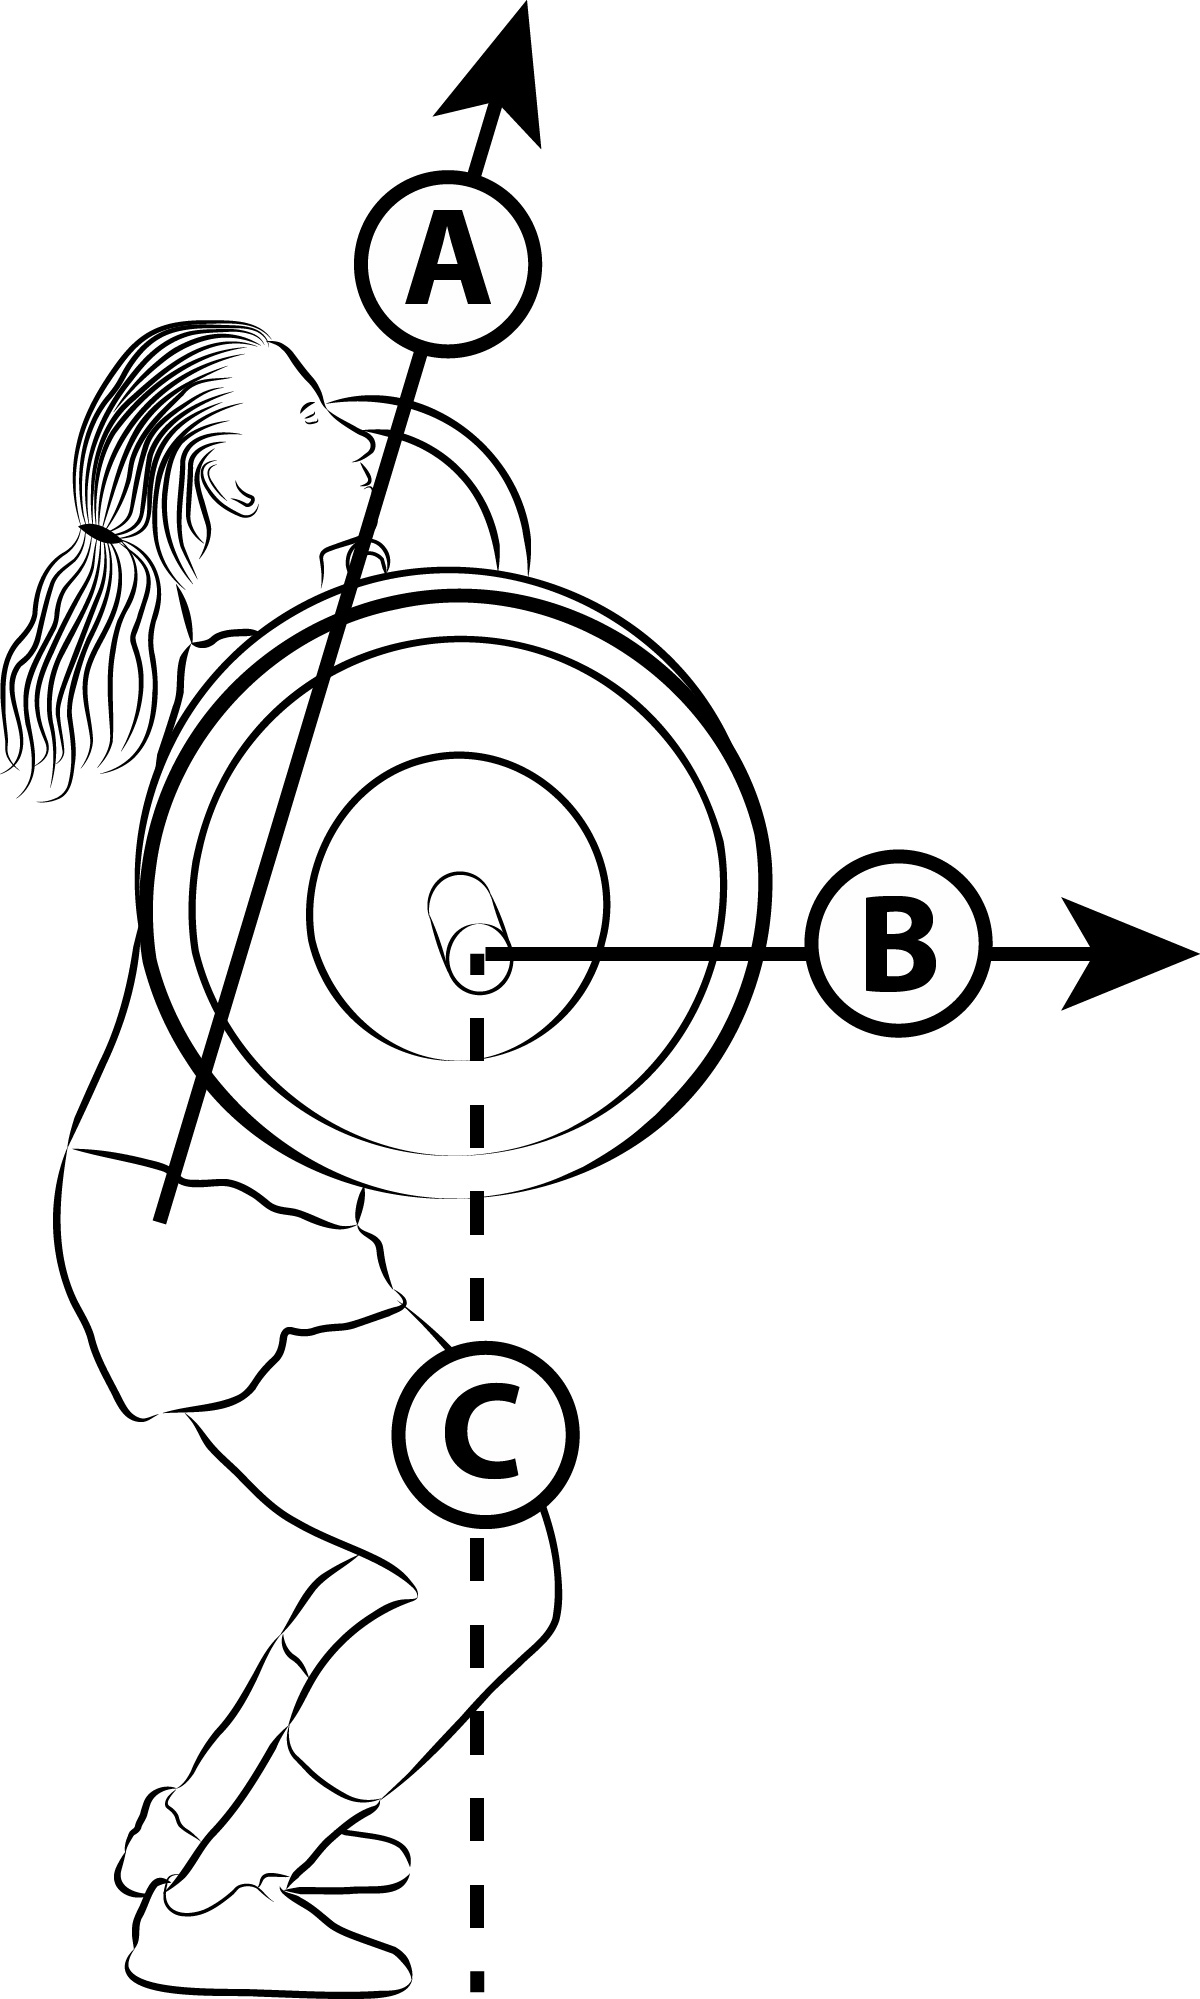
A – The direction the bar will travel from the bottom of the dip. B – The bar picks up forward momentum which is usually unstoppable. C – At the bottom of the dip, the bar is outside of the base of support and this creates balance problems.
Objective 1: Teach the athlete to “dip” with a vertical torso. If this proves difficult, the athlete should perform Jerk Dips with their back flat to a wall so that that get proprioceptive feedback.
Objective 2: The athlete must learn to control the speed of the dip and keep the upper body well braced. If the athlete dips too fast it is likely that at the change of direction of the bar (from downward movement to upward movement), the athlete will lose postural control, the chest and elbows will drop and effectively the athlete ‘buckles”. If this happens, it is usual for the Jerk to be unsuccessful.
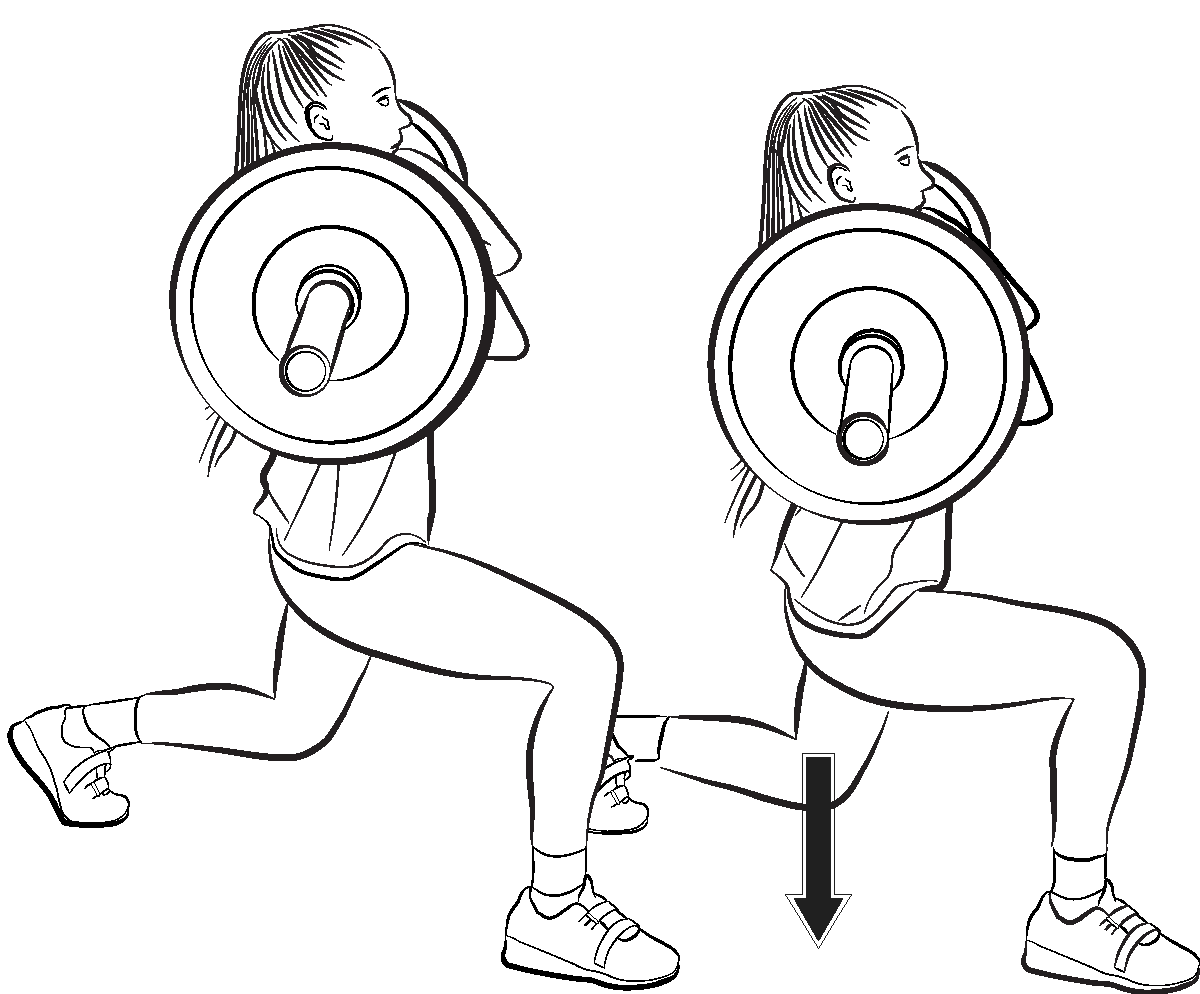
Step 2: Teach/learn the Split Squat
Split Squats (see Figure 4 below) are a crucial exercise that should be implemented in the earliest sessions of the beginner Weightlifter. The exercise must be performed correctly and usually requires considerable coaching. The purpose of the exercise is to teach the receiving position for the Jerk in which:
- the upper body is vertical with hip directly under the bar
- there is equal distribution of weight on both feet
- the back knee is bent so that the rear femur is almost vertical.
- the back foot is straight with heel raised
- the front shin is vertical
- the upper body is braced with chest raised and elbows are high.
There are three key learning objectives in performing the Split Squat:
Objective 3:The athlete develops strength and confidence to take weight on their ‘back leg’ while the knee is bent. In the initial stages of learning, it is often easier for the beginner to jerk with a straight back leg but if this is not corrected, it usually leads to significant issues in performing the good technique of the Jerk with limit weights.
Objective 4: The athlete learns to maintain pelvis in normal alignment (without forward tilt of the pelvis). This is greatly important in avoiding an awkward hyper-extension in the lumbar spine. Not only is the hyper-extension an injury risk but also it usually results in the hips being behind the bar, rather than directly beneath the bar. This make it hard to stabilise limit weight overhead.
Objective 5: The athlete learns to keep front shin completely vertical at all times in the split position. It is often necessary for a coach to use hands on coaching to physically prevent the knee going forward during the split squat movement. The athlete must be able to sense their shin being vertical and that is why the coach must assist.
The actual amount of downward movement of the body while performing the split squat need only be 10-15cm. There is no need to touch the back knee on the ground. However, as can be seen in Figure 4 above, the back knee should move vertical downwards. Importantly, the athlete should practise holding the low position for 2 seconds before rising. This is an important strategy for preparing athletes for limit weights in the years to come.
Step 3: Teach/learn the Jerk Balance
After the Split Squat has been practised for around 3 or more sessions and the learner is achieving the above objectives, the next step is to incorporate the Jerk Balance. Weights must be kept very light for many weeks to ensure the athlete can achieve the required body position.
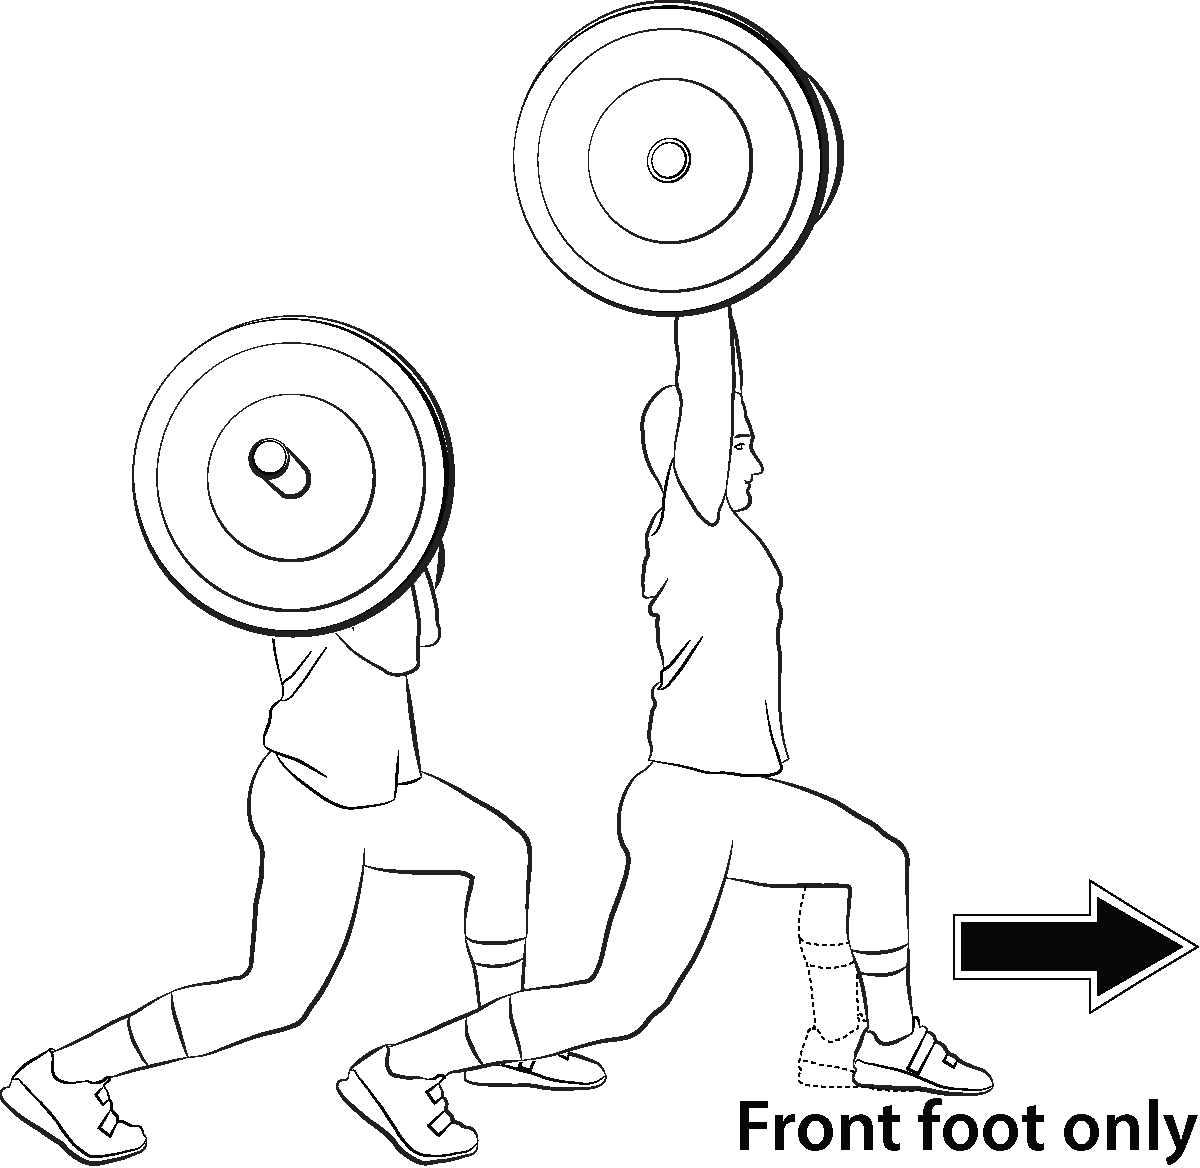
The main difference is that instead of practising the split position with the bar on the shoulders, the athlete learns to raise the bar from the shoulders and practise the split position with the bar directly overhead. The starting position in the Jerk Balance is the same as the starting position for the Split Squat. To facilitate the movement of the bar from the shoulders to above the head, the athlete is allowed a small upward push from the legs while the feet are in the split position. During the action of raising the bar from the shoulders to overhead, the athlete purposefully drives their front foot forwards 10-15 cm. After a 2 second pause in the receiving position, the bar is lowered again to the shoulders and the front foot is retracted back to it starting point.
This exercise has the same learning objectives as the Split Squat but also two more:
Objective 6: The athlete demonstrates the ability to hold the bar directly above the head, and furthermore the bar, head, shoulders and hips should be in vertical alignment.
Objective 7: The athlete demonstrates the ability to move their front foot close to the ground in a fast stabbing action. High foot lift is a common error (see Figure 6 below) and although feet may be moving fast, the distance they move is greater. As the a result feet take longer to reach their destination.
Step 4: Teach/learn rapid movement under the bar
This step is about ensuring that the athlete learns to rapidly move into the ‘split’ receiving position in a fast and efficient manner. This is a significant aspect of acquiring good technique of the Jerk. There should be a focus on moving feet very fast into the split position and it is necessary for the trajectory of the foot movement to be as close to the floor as possible. To achieve the learning of fast foot movement, it is necessary for the beginner athlete to perform skill drills with very light weights at first. The exercise is quite a challenge until the athlete works the problem out.
Objective 8: The athlete regularly practises Jerks with lights weights to develop speed under the bar and low receiving positions to rehearse what will be required with maximal lifts.
Step 6: Teach control and balance in the receiving position
Many, many Clean and Jerks are lost at the very last moment. The athlete appears to have succeeded only to rush the recovery and lose control of the weight. It should be appreciated that a maximally heavy weight overhead is a very difficult balance issue and athletes must practise control and balance in the receiving position at all training intensities.
Objective 9: The athlete practises a slow and controlled recovery from the receiving position to the finish position, moving their front foot first. This is a very important, often overlooked aspect of the technique of the jerk.
Other Articles on Jerk Technique


